Mini CI/CD for Personal ML Projects
If you are working in a big tech company, chances are you have a CI/CD pipeline built by engineers and devops for you. But what if you are working on a small side project, research or kaggle? You can still set up pretty decent CI/CD pipeline using github-actions. In this post I show how to take your ML project to the next level by:
- Automatically testing your code when a PR is created (pytest and pep8 compliant).
- Automatically running new models in PR on testset and printing a summary as a message.
- Serving model using FastAPI on aws and automatically deploying new models when PR is merged.
These steps should not be taken as all-or-none, for example even if your project has no ML you should still add automatic steps to run tests and linting on your code.
The example project with all these goodies is here, and the model is served here
GitHub Actions
With github actions you can automate tasks within your github repository. You can configure it to run a series of commands after a specified event occurred, for example run tests when a pull-request is created, or run a deployment command when a pr is merged to main branch. All you need are a few .yml files in your repository that configure what command to run after which event.
Sentiment Project Structure
The example project I’m working on is a tweet sentiment classifier. Given a raw tweet return if its sentiment is positive or negative.
The project structure is:
├── .github
│   └── workflows
│       ├── eb-deploy.yml
│       ├── model-performance.yml
│       └── python-quality.yml
├── sentiment
│   ├── __init__.py
│   ├── inference.py
│   └── processing.py
├── app
│   └── main.py
├── tests
│   ├── __init__.py
│   └── test_inference.py
├── Dockerfile
├── README.md
├── requirements.txt
├── train.py
├── eval.py
└── upload_model.py
.github - Workflow yml files to trigger github-actions.
sentiment - Core sentiment module. The inference code downloads the model binary from s3 when created.
app - Serving module using FastAPI.
tests - Some tests.
train.py - Train the logistic regression classifier.
eval - Run evaluation of model on testset.
upload_mode.py - Upload model to s3.
CI/CD Workflow
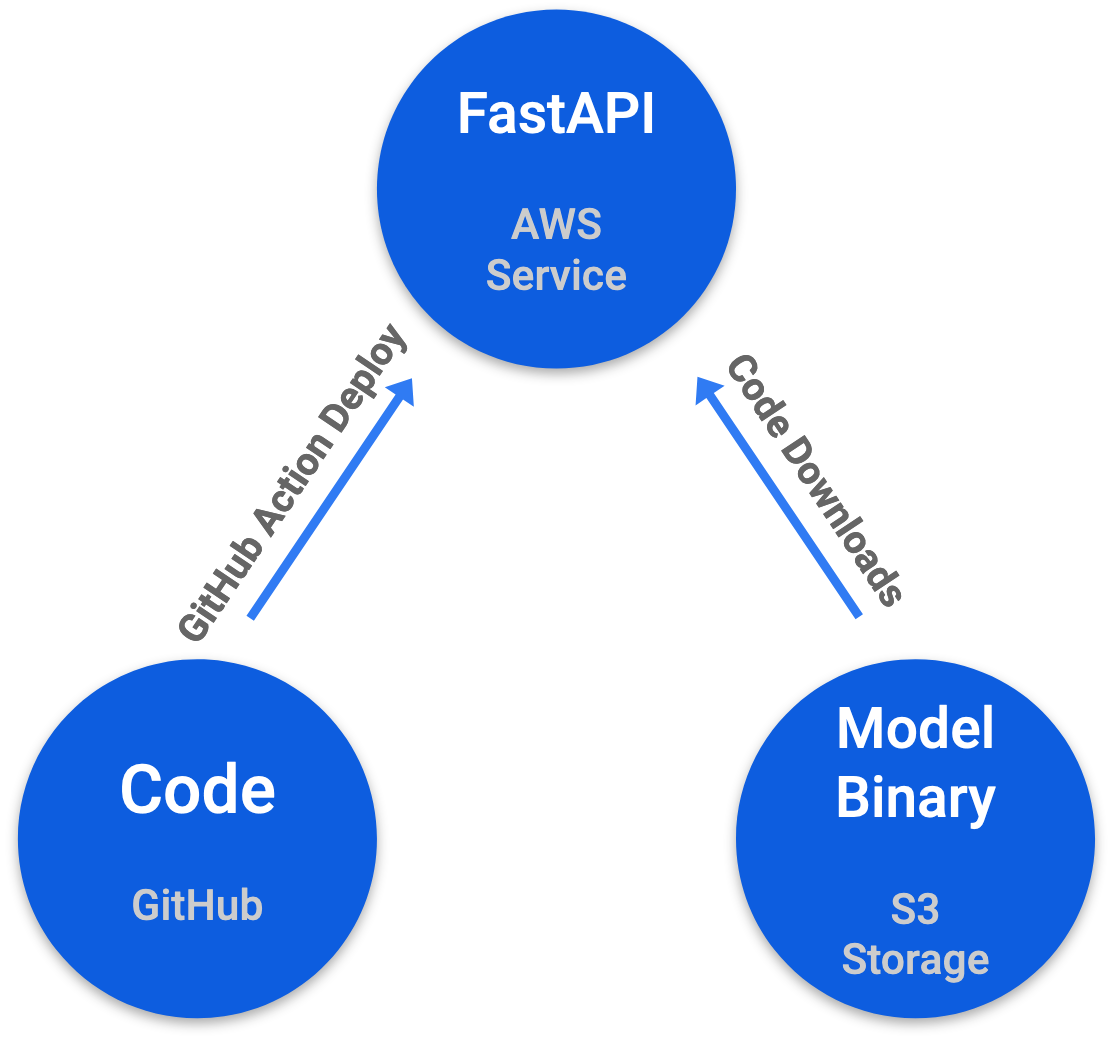
- Model is happily served here.
- Train and improve model.
- Manual upload new model to s3.
- Create pr with new code pointing to new model location → triggers testing and model evaluation.
- Merge PR to main branch → triggers model deployment script.
- goto step 1.
Lets go over these steps one by one:
Train Model
train.py training script creates a logistic regression classifier on tfidf features. The dataset is nltk.corpus twitter_samples containing 10K tweets. The code is self explanatory nothing more to say on this simple model :-).
After I’m happy with the code changes and model performance I upload the model binary to s3 and create a PR with the new code. The new binary should not overwrite the old one, the name convention I am using here is model_v1.pkl so the version number is in the name. This is important because the code currently in production is coupled with the old version and wont work if it suddenly reads a new binary. The new code in the PR should point to the new model binary and after the PR is merged the new code+binary will be served.
Model Serving
The web framework I am using is FastAPI, its really fast and designed for APIs. The application code is in main.py and basically has a single predict method
@app.get("/predict")
def predict(tweet: str):
    prob = inferencer.inference(tweet)
    return {
        'version': MODEL_VERSION,
        'tweet': tweet,
        'sentiment': 'positive' if prob == 1 else 'negative'
    }
the method expects the tweet to be in a query string, so sending “I have really good luck :)” looks like: http://sentiment-env.eba-pcptvp7e.us-west-2.elasticbeanstalk.com/predict?tweet=i%20have%20really%20good%20luck%20:%29. FastAPI adds a nice docs page you can also play with the API here.
For serving I am using AWS Elastic Beanstalk, an easy-to-use service for deploying and scaling web applications. There are several methods to deploy on Elastic Beanstalk but I find using a Dockerfile the easiest. Deploying using docker is super easy using the eb-cli. From the root directory run:
eb init -p docker sentiment
eb create sentiment-env
eb open
Mazal Tov ![]() , your model is now being served from the cloud.
, your model is now being served from the cloud.
If you haven’t ever set up access keys for aws check out this tutorial.
Pull Request Checks
When a PR is created two github-action workflows are started:
- python-qulity.yml - This workflow will run flake8 to enforce code style and run tests using pytest:
name: Python Quality and Tests
on: [pull_request]
jobs:
  build:
    runs-on: ubuntu-latest
    strategy:
      matrix:
        python-version: [3.6]
    steps:
    - uses: actions/checkout@v2
    - name: Set up Python $ { { matrix.python-version }}
      uses: actions/setup-python@v2
      with:
        python-version: $ { { matrix.python-version }}
    - name: Install dependencies
      run: |
        python -m pip install --upgrade pip
        pip install flake8 pytest
        if [ -f requirements.txt ]; then pip install -r requirements.txt; fi
    - name: Lint with flake8
      run: |
        flake8 --show-source --statistics
    - name: Test with pytest
      run: |
        pytest
For easier development you should use formatting tools such as yapf black and isort. These tools can be used directly in vscode and pycharm. You can also add mypy and pylint to the workflow and enforce even better code quality.
- model-perfomance.yml - This workflow will run the eval.py script, compare the result to main branch and comment a nice table in the PR conversation.
on: [pull_request]
jobs:
  comment:
    runs-on: ubuntu-latest
    strategy:
      matrix:
        python-version: [3.6]
    steps:
      - uses: actions/checkout@v2
      - name: Set up Python $ { { matrix.python-version }}
        uses: actions/setup-python@v2
        with:
          python-version: $ { { matrix.python-version }}
      - name: Install dependencies
        run: |
          python -m pip install --upgrade pip
          if [ -f requirements.txt ]; then pip install -r requirements.txt; fi
      - name: Run evaluation on main and branch
        id: eval
        run: |
          branch_eval=`python eval.py`
          git fetch --prune
          git checkout main
          main_sha=`git rev-parse --short HEAD`
          main_eval=`python eval.py`
          table=$(echo " \
          | branch                  | SHA              |  accuracy     | \n\
          | :-------------:         |:-----:           |:-------------:| \n\
          | main                    | $main_sha        | $main_eval    | \n\
          | $  | $  |$branch_eval   | \n\
          ")
          echo "::set-output name=table::$table"
      - uses: actions/github-script@v3
        with:
          github-token: $ { {secrets.GITHUB_TOKEN}}
          script: |
            github.issues.createComment({
              issue_number: context.issue.number,
              owner: context.repo.owner,
              repo: context.repo.repo,
              body: '${ {steps.eval.outputs.table}}'
            })
The result looks like this:
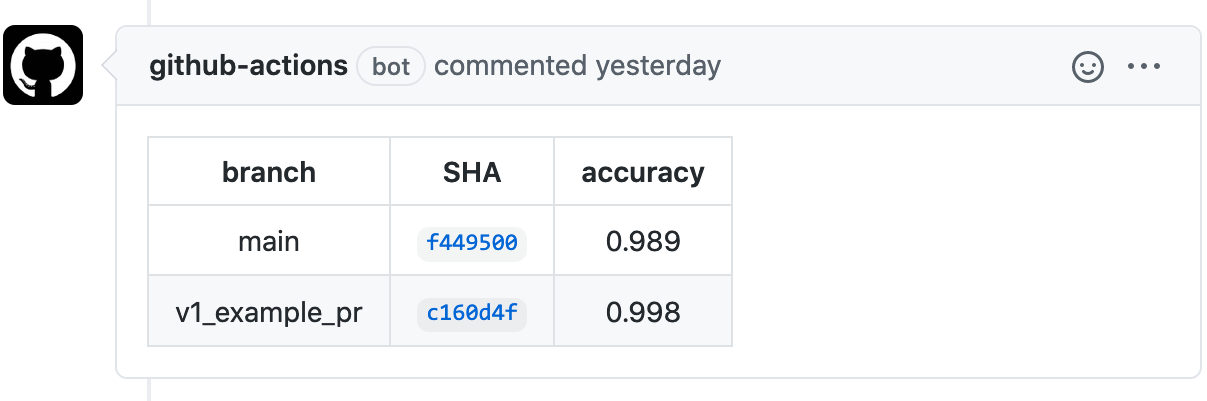
You can edit the yml to display any table/result you like.
Merge PR
After the PR is approved and merged to main branch, eb-deploy.yml workflow kicks in and runs the eb-cli to deploy the new code. This workflow expects the repository to have the aws access tokens as secrets.
name: Deploy on aws elasticbeastalk
on:
  push:
    branches:
      - main
jobs:
  build:
    runs-on: ubuntu-latest
    steps:
    - uses: actions/checkout@v2
    - name: Set up Python
      uses: actions/setup-python@v2
      with:
        python-version: '3.6'
    - name: Install ebcli
      run: |
        pip install awsebcli
    - name: deploy
      run: |
        eb deploy sentiment-env
      env:
        AWS_ACCESS_KEY_ID: ${ { secrets.AWS_ACCESS_KEY_ID }}
        AWS_SECRET_ACCESS_KEY: ${ { secrets.AWS_SECRET_ACCESS_KEY }}
And thats it! new model and code are now being served.

Final Words
Adding these simple workflows can improve your productivity and code quality!
- Its easy to reproduce earlier results by checking out an earlier version that uses the matching binary.
- High code quality and testing is super important for your project to be readable by others.
- Deployment becomes something you set once and forget about it.
- In this post I did not talk about dataset versioning which is important to reproduce results. During a project life cycle the dataset changes, gets fixed and gets bigger. Each version of the code+binary should also be coupled with the version of the dataset so that checking out an early commit can reproduce the exact model with the same data.